The power steering system in these old vans are notoriously famous for leaking in several places. The most common being around the pump, where it drips straight down into the alternator. This in turn contributes to premature alternator failure. I had a brand new rebuilt alternator put in and a couple of weeks later my power steering pump started leaking – right onto my new alternator!
This weekend I buckled down and replaced the pump with a new, quality rebuild. It’s a fairly straightforward job, with the proper tools and knowledge. By reading this post, hopefully you can learn a few things that will save time next time you have to replace the power steering pump.
Note: this write-up was performed on my van which is a 1987 4WD with manual transmission. Slight variances may occur between years and auto/manual trans models.
Parts:
(Input your van’s year/model at RockAuto.com to verify you get the proper part)
- Rebuilt power steering pump
- Power steering pressure hose (optional)
- Power steering seal kit (optional)
- Power steering reservoir hose (optional)
Tools:
(I use mostly Tekton and Kobalt tools. If you’re an amazon customer, I can vouch for the quality and lifetime warranty of Tekton tools. Great experience so far.)
- Socket wrench set and/or ratcheting flex-head wrench set
- Torque wrench
- 22mm wrench/socket
- Chain clamp tool
- Breaker bar
- Belt tension tester
- Socket adapters (optional – useful to adapt different size sockets/wrenches)
Shop supplies:
The factory service manual outlines the steps from removing the pump, as well as flushing and bleeding the power steering system. The procedure for removing the pump is found on page SR-29, reinstallation of the pump on page SR-37, and procedures for replacing and bleeding fluid are found on pages SR-25 through SR-27.
Step 1: Remove hoses
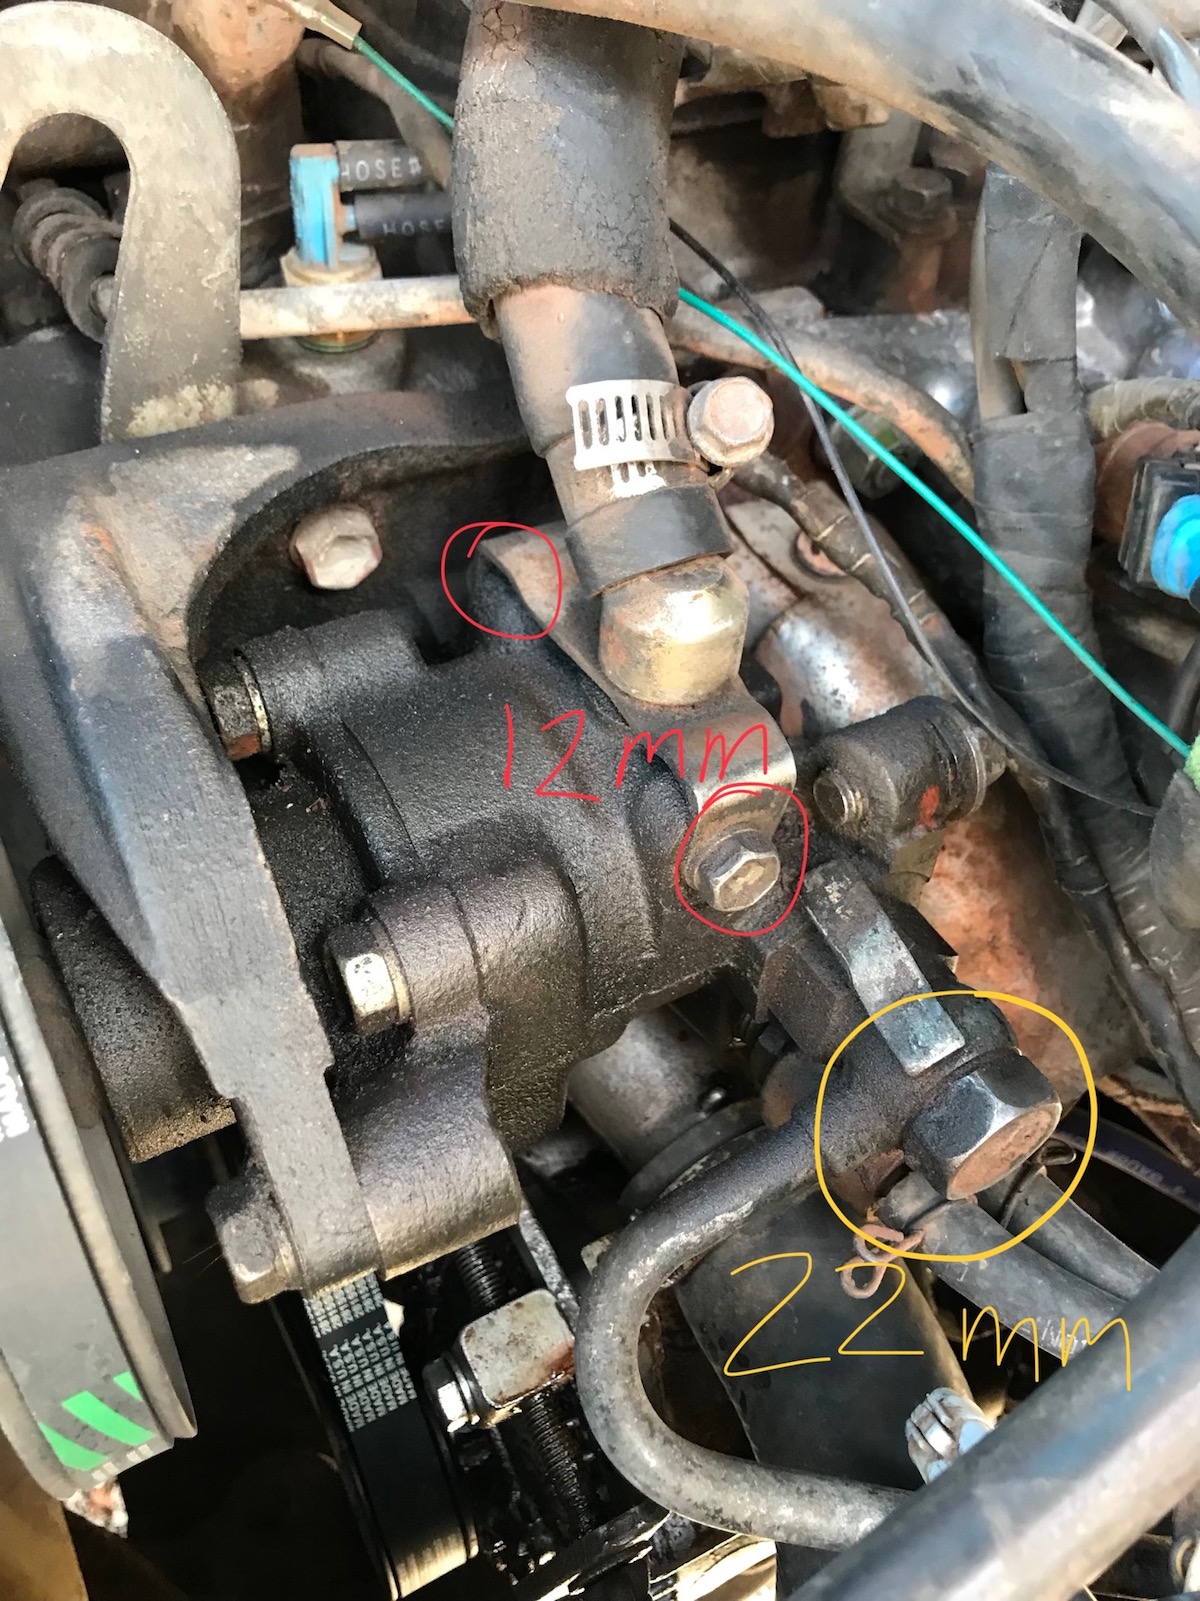 The hose on top is the supply hose, the 22mm banjo fitting is the return hose
First, disconnect the air valve hoses. Those are the two small hoses straight below the return hose fitting (marked with the 22mm bolt in the photo above)
You’ll want to have a container of some kind to catch any fluid that leaks out. Another thing you can do is get some aluminum foil and wrap your alternator or whatever other parts below the pump you don’t want getting smothered. I tried my best to form a piece of tin foil that would catch and drain the fluid out a single point so I could catch it in a milk carton that I cut open and set on the ground underneath. It worked ok but I still managed to make a mess…
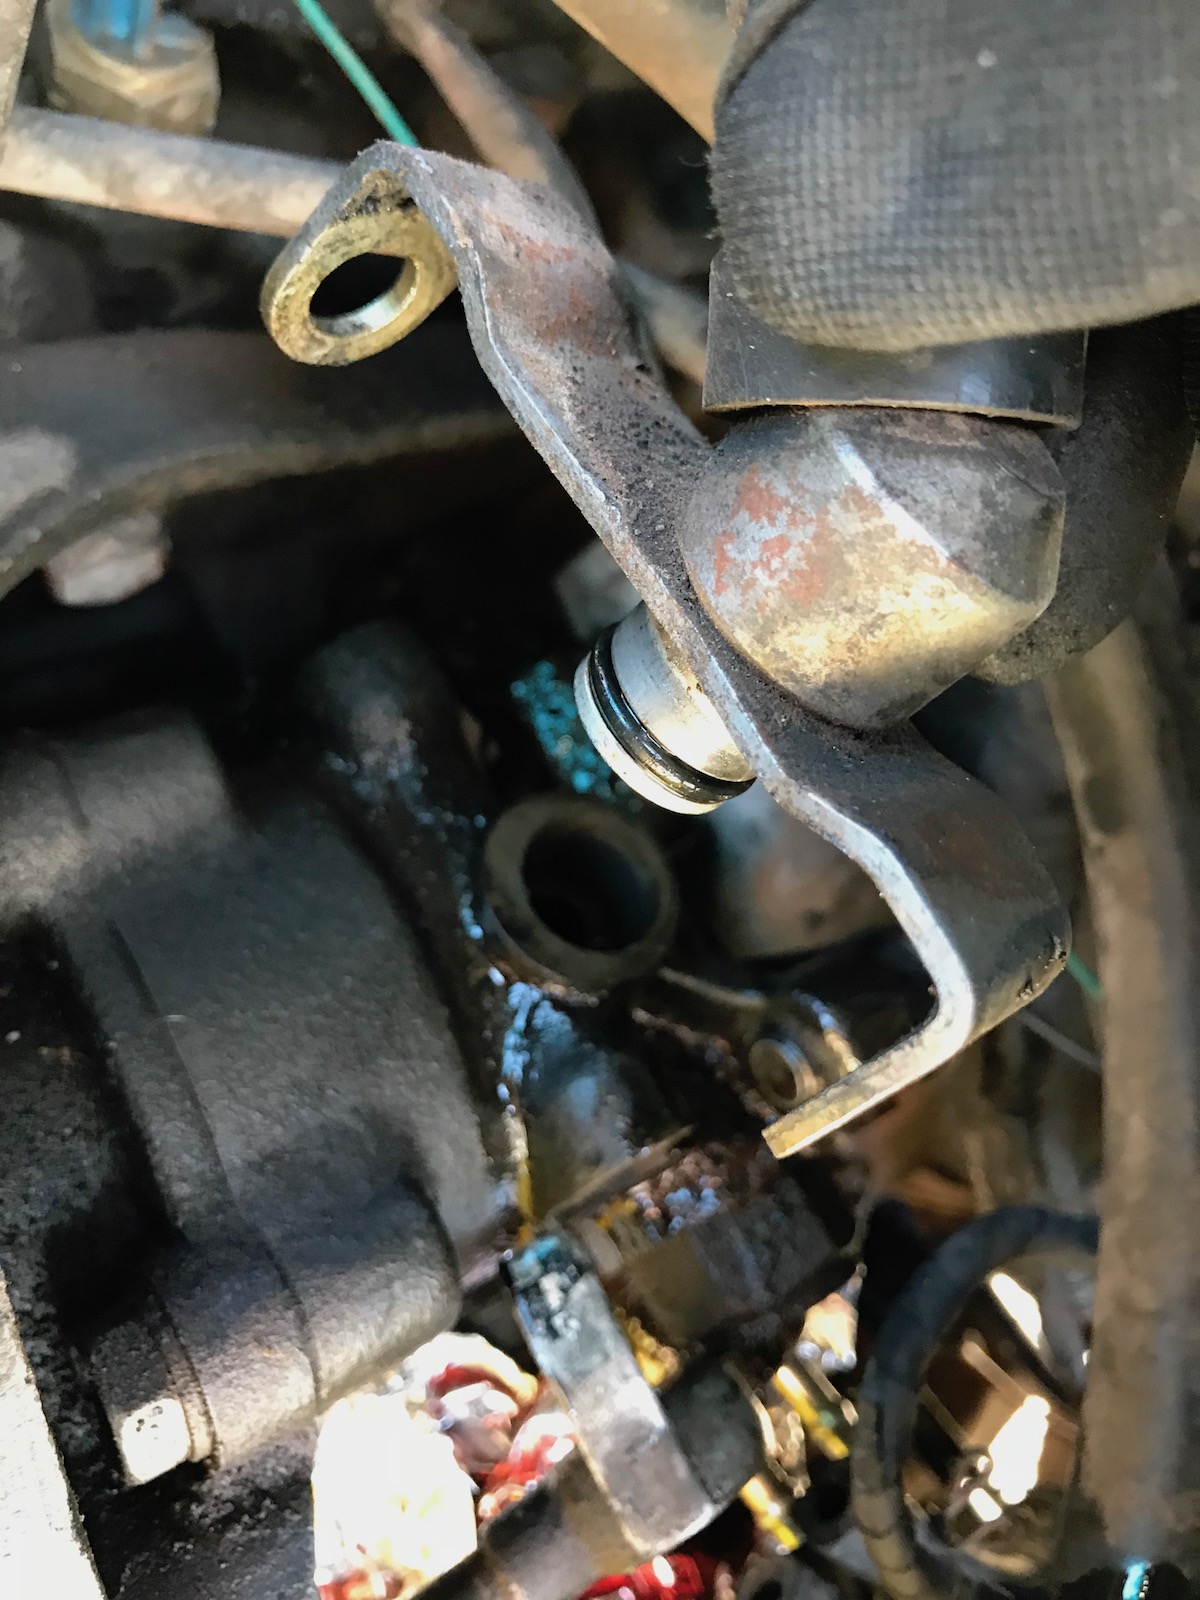
Before moving on to the next step, you’ll want to replace the o-ring on the supply line nozzle. This is a very common leak point for the power steering system and has leaked fluid all over (and subsequently ruined) many van alternators. The replacement pump should have come with one. If not you might be able to find one that will fit locally or by using the one included in the Gates 351830 power steering seal kit. Your new pump should have also come with new copper washers for the banjo fitting for the pressure line on the side of the pump so don’t forget to use those new gaskets upon reinstallation.
Step 2: Remove belt and pulley
Next, we’ll need to remove the power steering belt and pulley. I did this by loosening the pulley set nut first. This is the 14mm nut on the small pulley in the top left of the photo below. Then release the tension on the belt by loosening the drive belt 12mm adjust bolt just above the pulley. Once its loose enough you can slide the drive belt off.
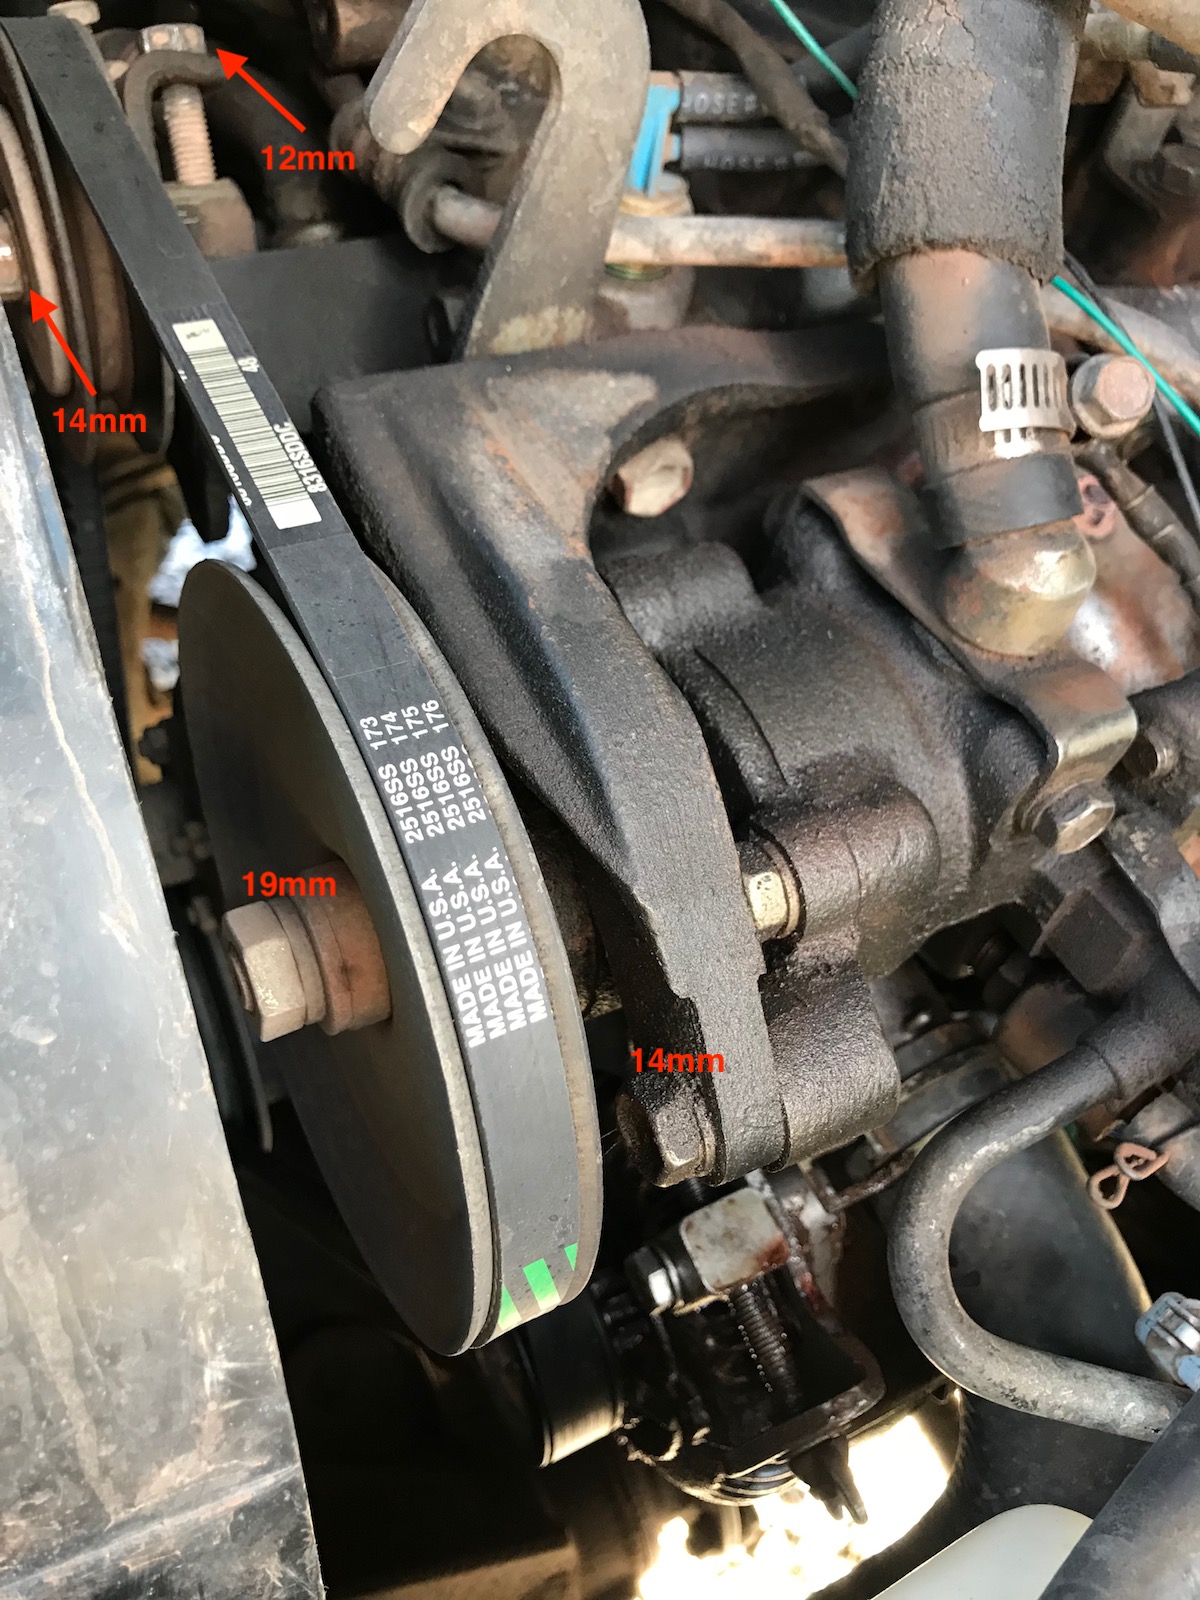
Next, grab a 19mm socket or impact wrench and try to remove the bolt from the nut mounted to the power steering pump. After fighting this bolt with no success (turning it causes the engine to turn with it), I finally gave in and ran to the AutoZone to buy a chain clamp tool. This made it so easy. It works just like a vise grip. Simply loop the chain around the pulley, clamp it down, and hold it in place while you break the bolt loose. A breaker bar will make this even easier.
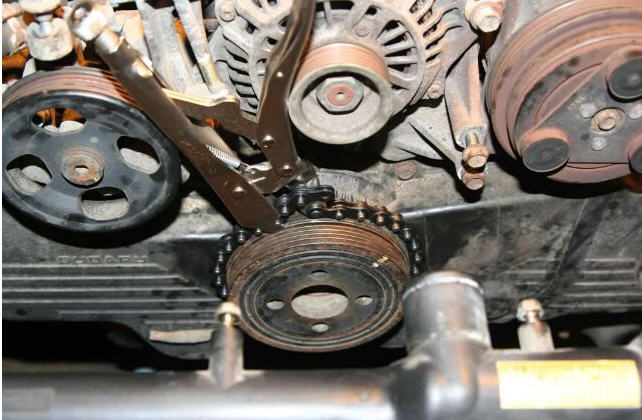 Not the van, but illustrates how this tool works. A huge time saver.
Step 3: Remove the power steering pump
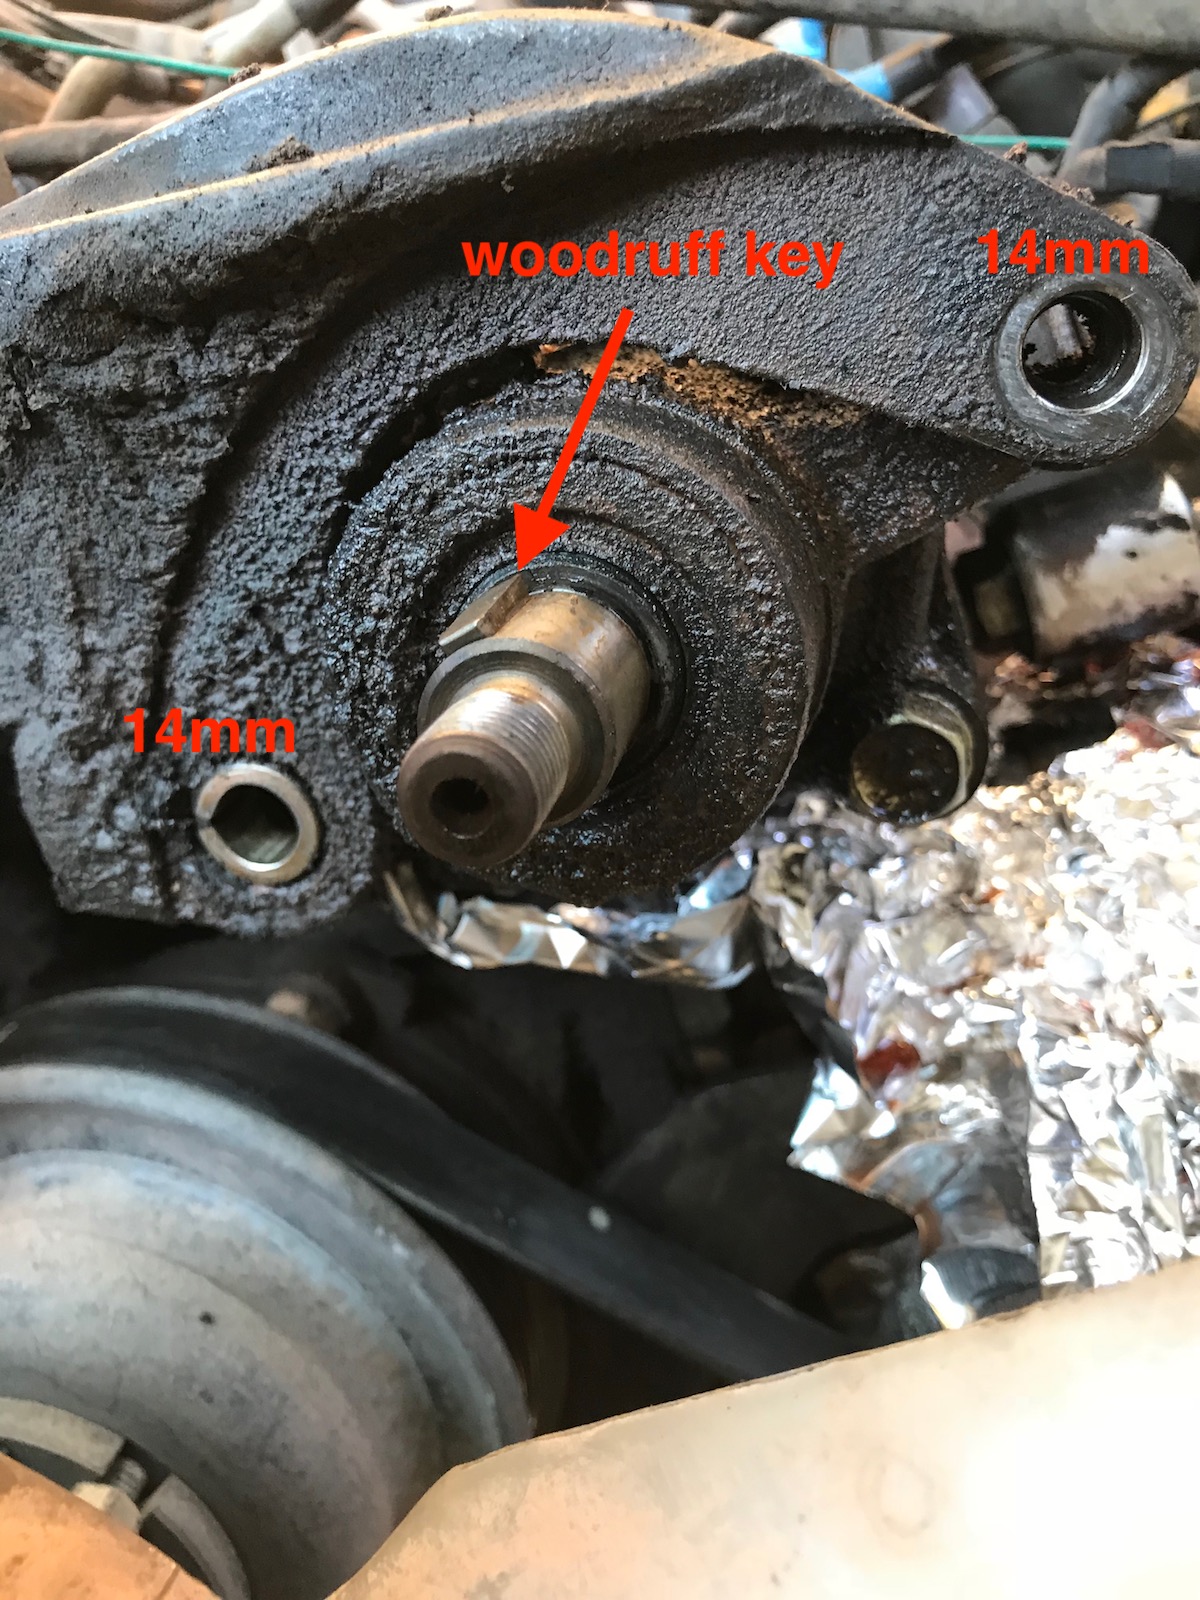
Now that everything is out of the way, simply remove the remaining 3 mounting bolts (two in front, one on back) with a 14mm wrench. Be aware of the small, half circled “key” lodged into the shaft of the pump. This is called a woodruff key. Your new/rebuilt replacement pump should have included a new one, but just in case they didn’t, you’ll need to reuse this. It’s very easy to lose and not even notice!
Optional: inspect reservoir screen
 Dirty reservoir on the outside, but clean on the inside where it counts
At this time, it might be good to inspect the power steering fluid reservoir as well. I used a flashlight to look in and see if the screen at the bottom of the resevoir is dirty. Fortunately mine was quite clean. The screen acts as a sort of pre-filter for the system. Sometimes the resevoir can get enough dirt and junk in it to clog the screen, not allowing enough fluid to get into the system when it’s needed. If this is the case, the resevoir is easily removed with two bolts and by disconnecting the two hoses. Once that’s done, flip the resevoir upside down and there are a few tabs holding the lid on. Bend those tabs back to remove the lid and access the screen. Clean the screen and resevoir and re-install.
Step 4: Install the new pump
Remove the air control valve from the old pump, wipe it down, and screw it into the new pump.
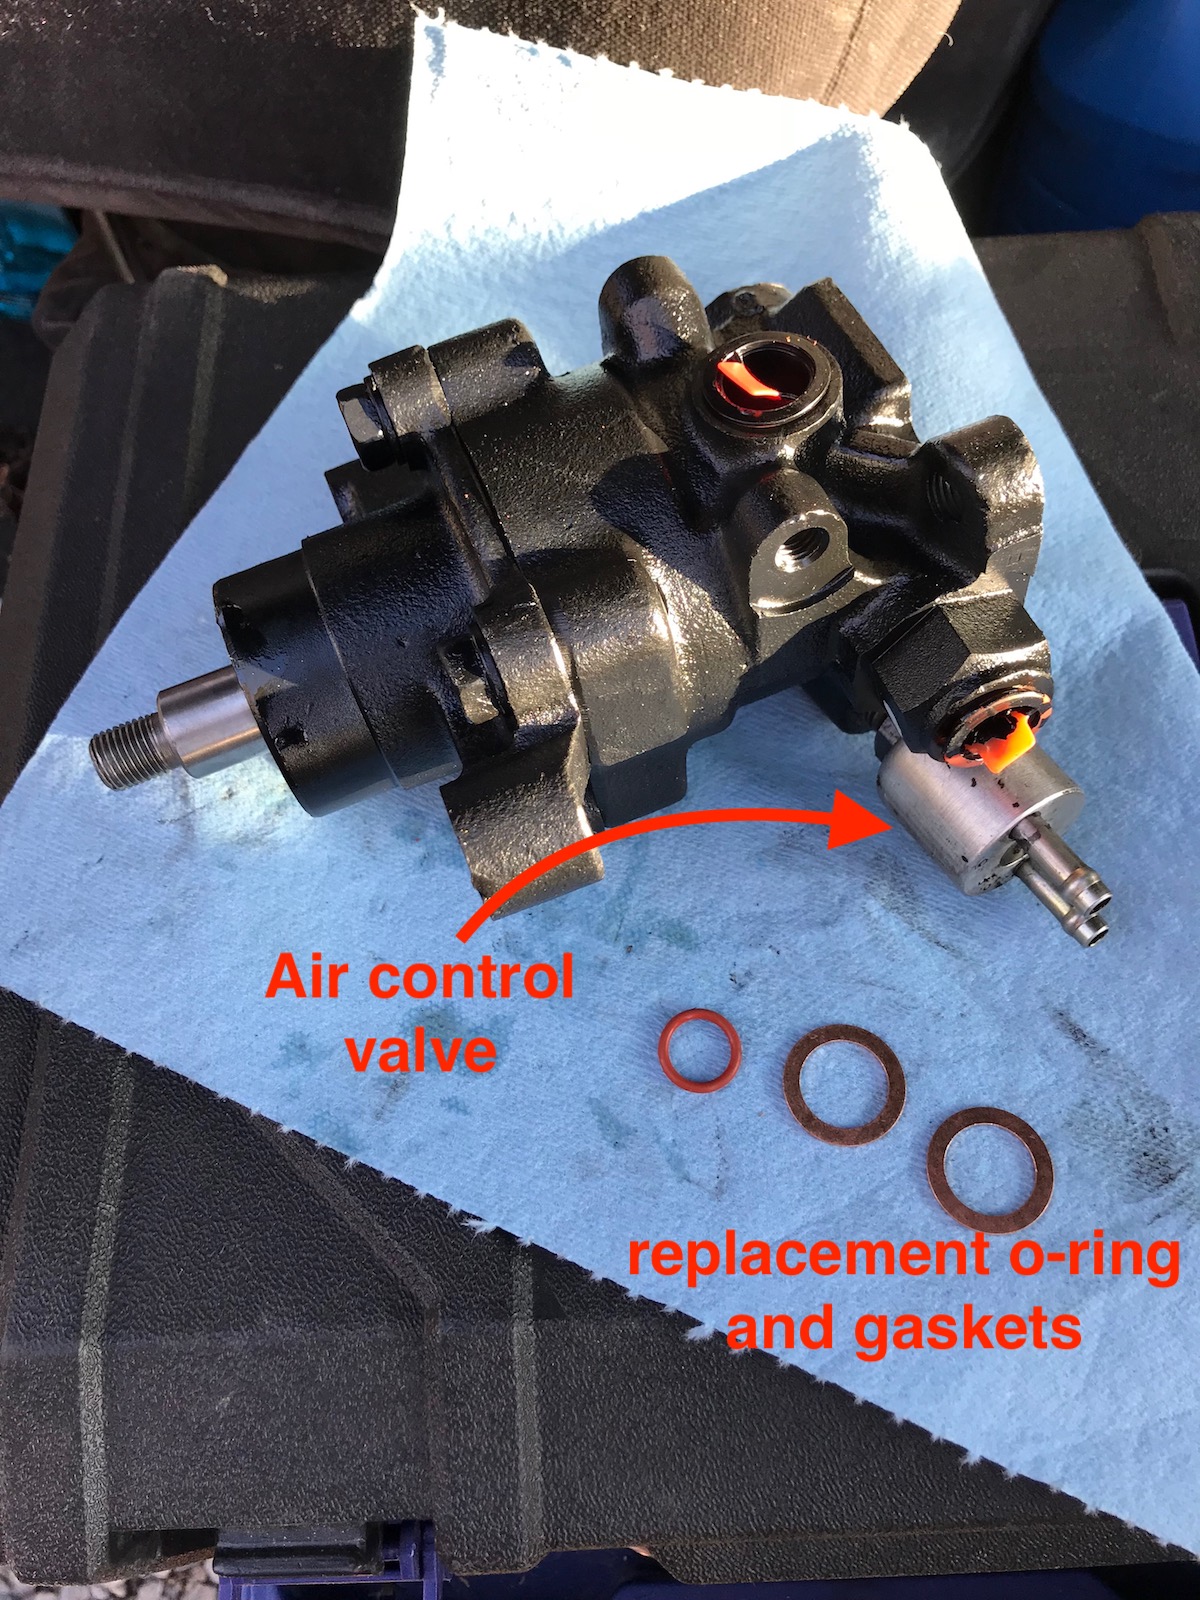 Dont forget to install the new o-ring and gaskets!
After that’s done, you can remove the little plastic plugs in the new pump and install it by following these directions in reverse – bolt it to the mounting bolts, re-attach the pulley and belts, then re-connect the hoses.
Be sure during reinstallation not to miss these three things:
- install the new woodruff key on the pulley shaft, if missing;
- install a new o-ring on the supply line that plugs into the top of the pump;
- install new copper gaskets on each side of the pressure line on the side of the pump.
Torque the bolts to the following specifications in the factory service manual:
- Drive pulley set nut: 32 ft-lb
- Idler pulley set nut: 29 ft-lb
- Mounting bracket bolts: 29 ft-lb
- Pressure tube nut: 33 ft-lb
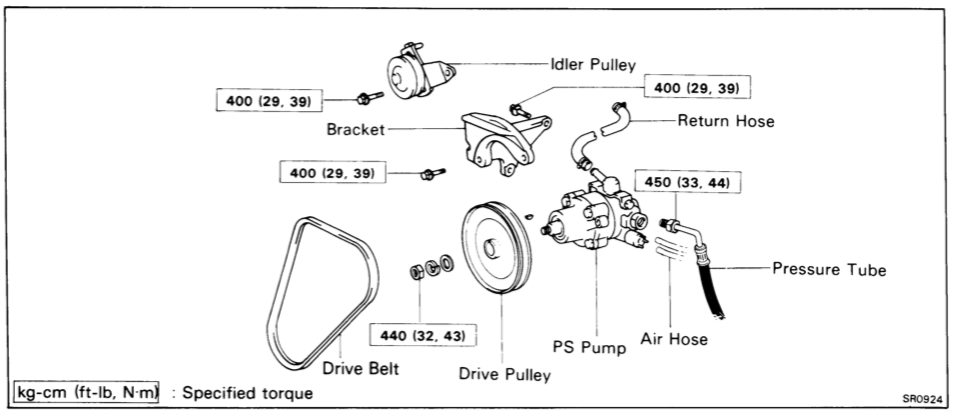 Factory torque specs for the power steering pump nuts/bolts
Step 5: Flush/refill the power steering fluid
Check out the factory service manual on pages SR-25 thru SR-27 for a detailed step-through on flushing/bleeding/filling the system. This is necessary if there is fluid or air in the system. If there is air in the system, the fluid in the reservoir will bubble and foam when you refill it and start turning the wheel. If the fluid is dirty (brownish or any other weird color besides red) then you should flush it as well. This is done by disconnecting the pressure line from the reservoir and letting it drain into a container while you have a helper turn the wheel back and forth in full turns. Refill the fluid level as the old fluid drains until it comes out clean and no longer foams up. Don’t let it drain empty during this process or more air will be introduced in the system!
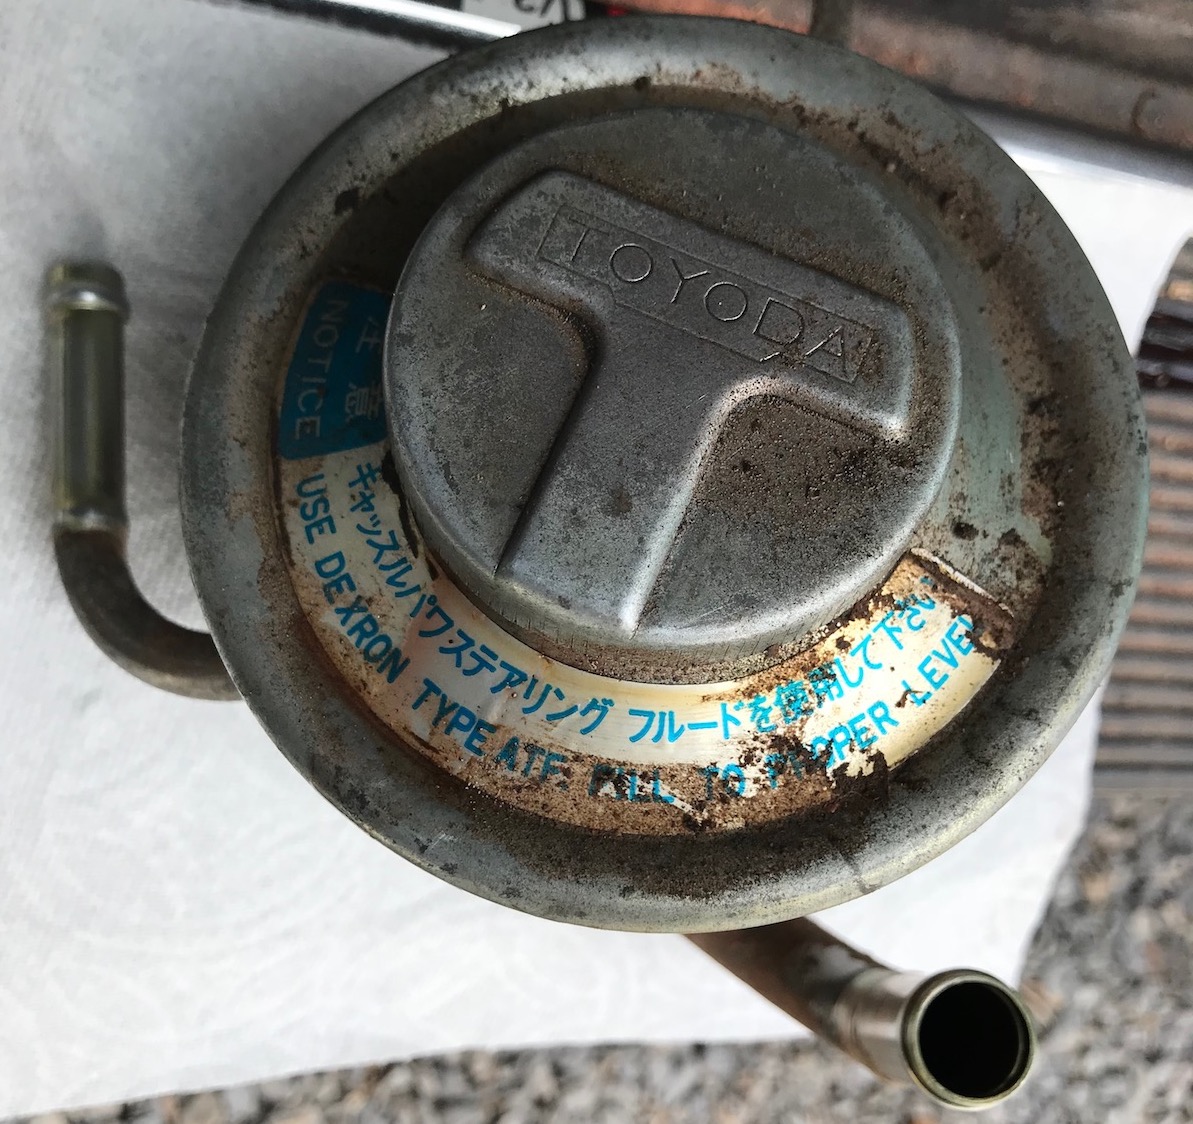
In my case the old ATF fluid was a nice red color, and the bubbling was very small amount so it appeared to be clean and mostly air free. All I had to do was refill the reservoir to the proper level. DO NOT USE POWER STEERING FLUID. Use Dexron I, II, or III Automatic Transmission Fluid (ATF). To refill, I filled the reservoir full, then turned the wheel one full turn to the left, then one full turn to the right, checked the fluid level, refilled if necessary, and repeated these steps until the fluid level at the reservoir stayed stable. At that point it should have all the fluid pumped back into the system.
Congratulations on completing this job! Now enjoy the feeling of knowing your alternator is no longer being ruined by a drippy power steering pump.